RV Roof Replacement: A Complete Guide for Every RV Owner

Owning an RV offers the ultimate freedom to travel and explore the world, but it also comes with responsibilities. One of the most important aspects of maintaining an RV is ensuring that its roof is in good condition. The roof is one of the most vulnerable areas of an RV, exposed to the elements and subject to wear and tear. Over time, an RV roof may become damaged, and when this happens, a roof replacement becomes necessary. In this article, we will discuss the signs that indicate your RV roof needs replacement, the steps involved in the process, and tips for maintaining your new roof.
Why You Should Consider RV Roof Replacement
An RV roof plays a crucial role in protecting the interior of the vehicle from the outside environment. Whether it’s rain, snow, or intense sunlight, the roof acts as a barrier to ensure that the RV remains dry and insulated. However, over time, wear and tear can cause significant damage to the roof, including leaks, cracks, or even a complete breakdown of the roofing material.
If you notice any of the following signs, it may be time to replace your RV roof:
- Visible Leaks: One of the most common signs that your RV roof is compromised is water leaking inside. Leaks can cause extensive damage to the interior of your RV and promote mold and mildew growth. If you notice water spots on the ceiling or walls, it could be a sign that your roof is no longer providing adequate protection.
- Cracking or Peeling: The RV roof can become brittle and cracked over time, especially if exposed to extreme temperatures. If you notice areas where the roofing material is cracking, peeling, or bubbling, it’s likely that it’s no longer effective at keeping moisture out.
- Sagging Roof: A sagging roof is a serious issue that requires immediate attention. This typically indicates that the structural integrity of the roof has been compromised, often due to water damage or the breakdown of underlying materials.
- Aging and Wear: Even if you don’t notice any immediate leaks or visible damage, an aging roof may simply need to be replaced. Most RV roofs have a lifespan of 10-15 years, depending on the material and maintenance. After this time, the roof may no longer provide the protection it once did.
If any of these signs are present, it’s important to consider RV roof replacement to avoid more serious issues in the future.
Steps to RV Roof Replacement
Replacing an RV roof is a detailed process that requires careful planning and execution. While some RV owners may choose to replace the roof themselves, it is a complex task that is often better handled by professionals. If you decide to tackle the project yourself, here is an overview of the steps involved in replacing an RV roof.
Step 1: Remove the Old Roof
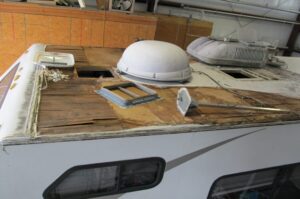
The first step in the replacement process is to remove the old roof material. Depending on the type of RV and the condition of the roof, this may involve peeling away layers of roofing, adhesives, and insulation. You may also need to remove any vents, skylights, or air conditioning units that are attached to the roof.
During this process, it’s crucial to inspect the roof’s underlying structure for any signs of rot or damage. If you find any significant issues with the structure, such as weakened beams or framing, it may be necessary to make repairs before installing a new roof.
Step 2: Clean the Roof Surface
Once the old roofing material has been removed, the next step is to thoroughly clean the surface. This includes removing any debris, dirt, or residue left behind by the old roof. A clean surface ensures that the new roofing material will adhere properly and provide a solid barrier against the elements.
It’s important to inspect the roof for any imperfections or damage during the cleaning process. If the roof has developed cracks, holes, or weak spots, these should be repaired before continuing with the roof replacement.
Step 3: Install the New Roofing Material
After preparing the surface, the next step is to install the new roofing material. There are several types of roofing materials available for RVs, including rubber (EPDM), TPO, and fiberglass. Each material has its own benefits and drawbacks, so it’s important to choose the one that best fits your needs.
- Rubber Roofing (EPDM): EPDM is one of the most popular materials for RV roof replacement due to its durability, flexibility, and affordability. It is resistant to UV rays and extreme temperatures, making it a great choice for long-lasting protection.
- TPO Roofing: TPO is another popular choice for RV roofs. It is known for its energy efficiency and resistance to heat and UV damage. TPO roofing is lightweight, durable, and easy to maintain, making it a great option for RV owners.
- Fiberglass Roofing: Fiberglass is a sturdy, high-performance material that provides excellent insulation. While it is more expensive than rubber or TPO, it offers superior strength and longevity.
Once you’ve selected the roofing material, carefully apply it to the roof surface according to the manufacturer’s instructions. This process typically involves applying a layer of adhesive to the surface and then rolling out the roofing material, making sure it is evenly spread and securely attached.
Step 4: Seal the Roof
Once the new roofing material is installed, the final step is to seal the edges and seams to ensure that no moisture can penetrate. Sealing the roof properly is critical to prevent leaks from developing over time. Use high-quality roofing sealant designed for RVs, and make sure to cover all seams, vents, and openings.
Step 5: Reinstall Any Roof Components
If you removed vents, air conditioning units, or skylights during the roof replacement, now is the time to reinstall them. Be sure to re-seal these components to prevent any leaks from forming around them. It’s also important to check the condition of any seals or gaskets before reinstalling, as old seals can contribute to roof leaks.
Maintaining Your New RV Roof
Once your RV roof replacement is complete, it’s essential to maintain it properly to extend its lifespan. Regular inspections and maintenance can help you catch any issues before they become serious problems.
- Inspect the Roof Regularly: Conduct periodic inspections of your RV roof, especially after a long trip or a storm. Check for any signs of damage, such as cracks, holes, or peeling. The earlier you catch any issues, the easier it will be to repair them.
- Keep the Roof Clean: Dirt, debris, and algae can accumulate on the roof, causing it to degrade over time. Regularly clean the roof using non-abrasive cleaners to remove buildup and prevent damage to the roofing material.
- Seal the Roof Annually: Over time, the seals around vents, seams, and other roof components can wear down. It’s important to reapply sealant annually to maintain the roof’s waterproof barrier.
- Protect the Roof from UV Damage: Prolonged exposure to the sun’s UV rays can cause the roof material to deteriorate. Consider using a UV protectant to shield the roof from sun damage, especially if your RV is parked outdoors for extended periods.
The Cost of RV Roof Replacement
The cost of replacing an RV roof can vary widely depending on several factors, including the type of RV, the roofing material chosen, and whether you hire a professional or tackle the job yourself. On average, an RV roof replacement can cost anywhere from $2,000 to $5,000, with additional costs for labor, materials, and roof components. If you’re doing the work yourself, the cost can be significantly lower, but it will require a considerable amount of time and effort.
Final Thoughts on RV Roof Replacement
Replacing your RV roof is a significant but necessary investment to maintain the integrity of your vehicle and protect it from the elements. Whether you choose to tackle the replacement yourself or hire a professional, it’s essential to act promptly when signs of roof damage appear. A well-maintained roof not only protects the interior of your RV but also contributes to its overall longevity and value. By choosing the right materials and keeping up with regular maintenance, you can enjoy peace of mind and ensure your RV stays in great condition for years to come.


